In this tutorial you put a Discord bot online, end to end, without your own server and without configuring any infrastructure. We will use an example bot that builds the channel structure of your server (information, community, support and developers categories) and stays online afterwards.
What you will need:
- a MyBotCloud account (sign-in is with Google);
- a Discord account and a server of your own, preferably empty, to test with;
- about 10 minutes.
1. Create the bot on Discord
- Open the Discord Developer Portal and click New Application. Give it a name, for example
MyBot. - In the left menu, open Bot.
- Click Reset Token and copy the token that appears. It is your bot's password: do not paste it in code, screenshots or chats. If it leaks, come back here and generate another one.
You do not need to enable any Privileged Gateway Intent: this bot only uses the basic guilds intent.
2. Invite the bot to your server
A token alone does not put the bot inside the server. You have to invite it:
- In the portal, open OAuth2 → URL Generator.
- Under Scopes, tick
bot. - Under Bot Permissions, tick Manage Channels and Manage Roles.
- Copy the Generated URL at the bottom of the page, open it in your browser, choose your server and click Authorize.
The bot shows up in the server's member list with a BOT tag.
3. Copy the server ID
The ID tells the bot which server to work on (without it, the bot acts on every server it is in):
- In Discord, open User Settings → Advanced and turn on Developer Mode.
- Right-click your server's icon and choose Copy Server ID. It is a 17 to 19 digit number.
4. Send the bot to MyBotCloud
- Download the example bot (
botstartup.zip). - In the MyBotCloud dashboard, click New application, give it a name, keep Node.js and choose the
botstartup.zipfile. - Under Environment variables, click Add variable twice and fill in:
| Name | Value |
|---|---|
DISCORD_TOKEN | the token from step 1 |
GUILD_ID | the ID from step 3 |
The filled-in form looks like this. The arrows show 1) the ZIP file, 2) the variables and 3) the button that creates the application (values are masked while you type):
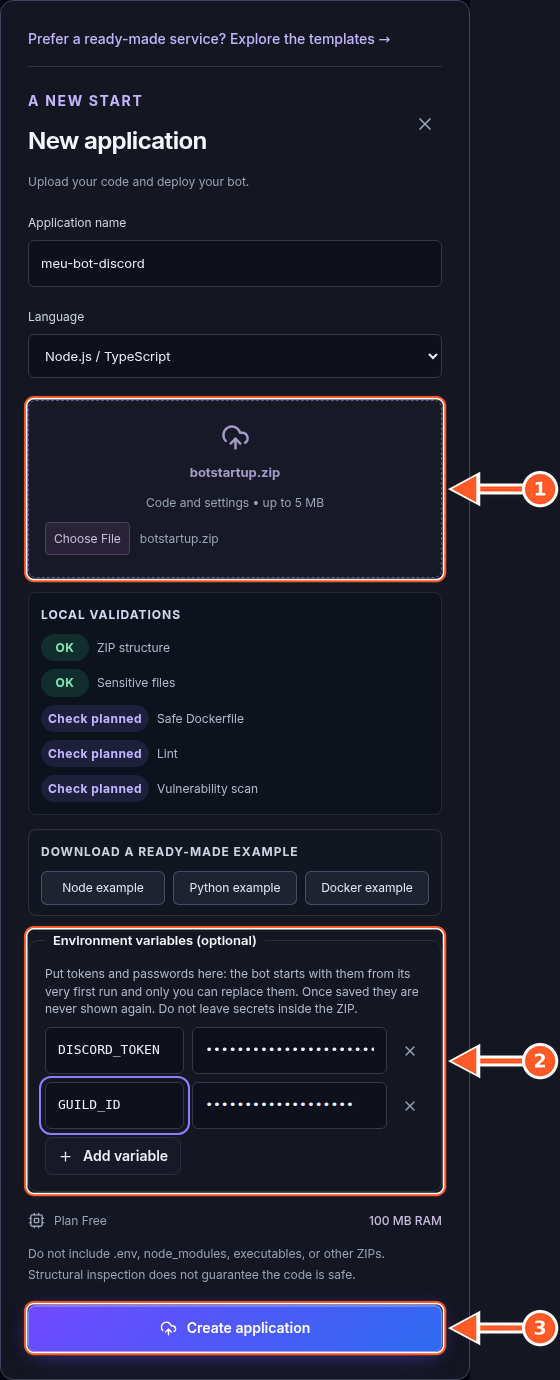
- Click Create application and wait about 40 seconds: the platform installs the dependencies and starts the bot.
Variables are write-only: once saved, they are never shown again on screen or in logs. They are available from the very first run, so the bot does not crash for lack of a token.
5. Check that it worked
Open Manage → Logs. The bot's messages are in Portuguese, and the expected result is:
Conectado como MyBot#1234
Servidor: Your server name
  + categoria 📢 INFORMATION
  + canal 👋・welcome
  ...
  pronto: 20 criados, 0 já existiam.
Estrutura verificada. O bot continua online.
(criados means created and já existiam means already existed.)
In Discord, the server gains 5 categories and 15 channels. The INFORMATION channels are read-only for members; only staff and the bot can write in them. The 🔒 STAFF category (with the 🚨・alerts channel) is invisible to members: it is where you can receive internal notices, for example from a webhook.
The bot can run again as many times as you like: it only creates what is missing.
How the bot works
The code is small. The structure lives in a list you can edit:
const STRUCTURE = [
  {
    category: "📢 INFORMATION",
    readOnly: true,
    channels: ["👋・welcome", "📢・announcements", "🟢・status", "📝・changelog"],
  },
  // COMMUNITY, SUPPORT, DEVELOPERS...
];
On start the bot connects with the Guilds intent, reads the server and creates what is missing. If you invite it after it is already running, it notices the join (the guildCreate event) and builds the structure right away. To change categories or channels, edit structure.js and use Update on MyBotCloud: your variables are kept.
Common problems
| What the log shows | What to do |
|---|---|
Falta a variável DISCORD_TOKEN | Add the variable under Manage → Environment variables. The bot restarts by itself. |
An invalid token was provided | The token was pasted with a space or was reset. Generate another with Reset Token and save it again. |
O bot ainda não está no servidor | The invite (step 2) is missing, or the GUILD_ID belongs to another server. |
Missing Permissions | The bot joined without Manage Channels and Manage Roles. Invite it again with those permissions, or drag the bot's role to the top of the role list. |
How many resources it needs
The example bot runs on the Start (free) plan and uses about 30 MB of the 100 MB of memory. There is room left for you to grow the code.
Security in one sentence
Never put the token inside the ZIP or the code: always use MyBotCloud's environment variables.
Next steps
Now that you have seen the full path, the same flow works for any Node.js bot: prepare the project as a .zip, pick the language, fill in the variables and upload. If you get stuck on any step, ask on our Discord.